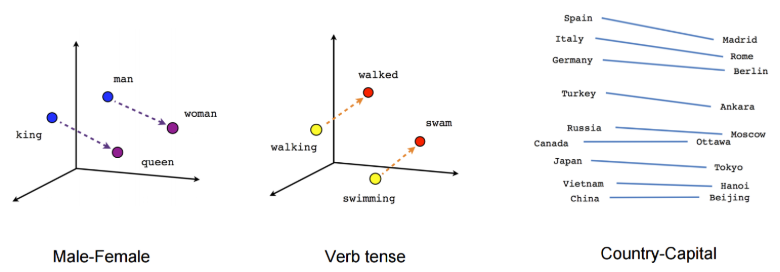
当处理文本中的单词时,传统的one-hot encode会产生仅有一个元素为1,其余均为0的长向量。例如若语料库中的单词数为10000,就会生成一个长度为10000的稀疏向量。这种方法虽然简单,但是效率不高;另外这种方法的一个主要缺陷是不能表达不同单词之间的相似性,例如下图所示的不同单词之间的关联:

GloVe
GloVe将每个单词转化为一个固定长度(注:一般来说这个长度远小于使用one-hot encode得到的向量长度)的向量,并且这些向量能表达不同单词之间的关联。下面介绍GloVe的主要思想:
首先定义\mathcal V为语料库中出现的所有单词的集合,|\mathcal V|代表单词的个数,引入两种词向量:
- center word vector: \boldsymbol{\vec v_i},表示\mathcal V中的第i个单词w_i作为中心词出现时的编码向量,也是需求解的词向量
- context word vector: \boldsymbol{\vec u_i},表示\mathcal V中的第i个单词w_i在中心词的上下文 (即中心词前n个词和后n个词) 中出现时的编码向量
定义矩阵X为一个|\mathcal V|行|\mathcal V|列的矩阵,则X_{ij}表示单词w_i作为中心词时单词w_j作为它的上下文出现的次数。例如假设w_i在整个语料库中出现过两次,每次出现时它的上下文单词(这里假设n=2)在\mathcal V中的序号分别为(2,1,5,2)和(2,3,2,1),则有X_{i1}=2,\space X_{i2}=4,\space X_{i3}=1,\space X_{i5}=1,\space X_{ij}=0,j\notin\{1,2,3,5\}根据上述介绍容易看出X为一个对称矩阵,即X_{ij}=X_{ji}。
定义p_{ij}为单词w_i作为中心词时w_j作为上下文出现的概率,则有p_{ij}=P(w_j | w_i)=X_{ij}/\sum_{j=1}^{|\mathcal V|}X_{ij},GloVe使用\exp (\boldsymbol{\vec u_j}^T\boldsymbol{\vec v_i})作为p_{ij}的度量指标,使得词向量可以表示不同单词之间的相似程度。GloVe需要优化的函数为\large \min_{\large \substack {\boldsymbol{\vec v_1, \vec v_2, \cdots, \vec v_{|\mathcal V|}} \\ \boldsymbol{\vec u_1, \vec u_2, \cdots, \vec u_{|\mathcal V|}} \\ \boldsymbol{b_1, b_2, \cdots, b_{|\mathcal V|}} \\ \boldsymbol{c_1, c_2, \cdots, c_{|\mathcal V|}} }}\sum_{i=1}^{|\mathcal V|} \sum_{j=1}^{|\mathcal V|} h\left(X_{ij}\right)\left(\boldsymbol{\vec u_j}^T \boldsymbol{\vec v_i}+\boldsymbol{b_i}+\boldsymbol{c_j}-\ln X_{ij}\right)^{2}其中权重函数h\left(x\right)为h\left(x\right)=\begin{cases}(x/m)^\alpha \text{ when }x<m \space\space\space(e.g., \alpha=0.75, m=100) \\ 1 \text{ when }x\ge m\end{cases}
因为矩阵X是对称阵,容易看出对GloVe应该有\boldsymbol{\vec v_i}=\boldsymbol{\vec u_i},但实际计算过程中由于\boldsymbol{\vec v_i}和\boldsymbol{\vec u_i}有不同的初始值,最后得到的结果不一定相同,因此Glove最终得到的词向量可以写为\boldsymbol{\tilde{\vec v}_i}=(\boldsymbol{\vec v_i}+\boldsymbol{\vec u_i})/2
词嵌入 (Word Embedding)
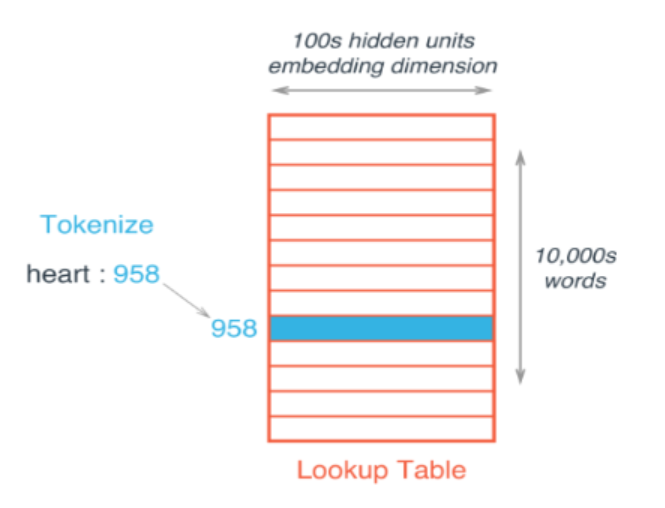
文章的上一部分介绍了如何使用语料库得到每个单词的词向量,实际应用中我们可以通过词嵌入的方法将从一个大的语料库训练好的词向量应用到自己要解决的问题中。如下图所示,假设训练词向量的语料库共有10000个不同的单词,即|\mathcal V|=10000,词向量的长度为100,则词嵌入方法会构建一个10000行100列的矩阵,矩阵的每个行就代表对应的单词的词向量,这样在计算过程中输入一个单词就可以直接得到它的词向量。

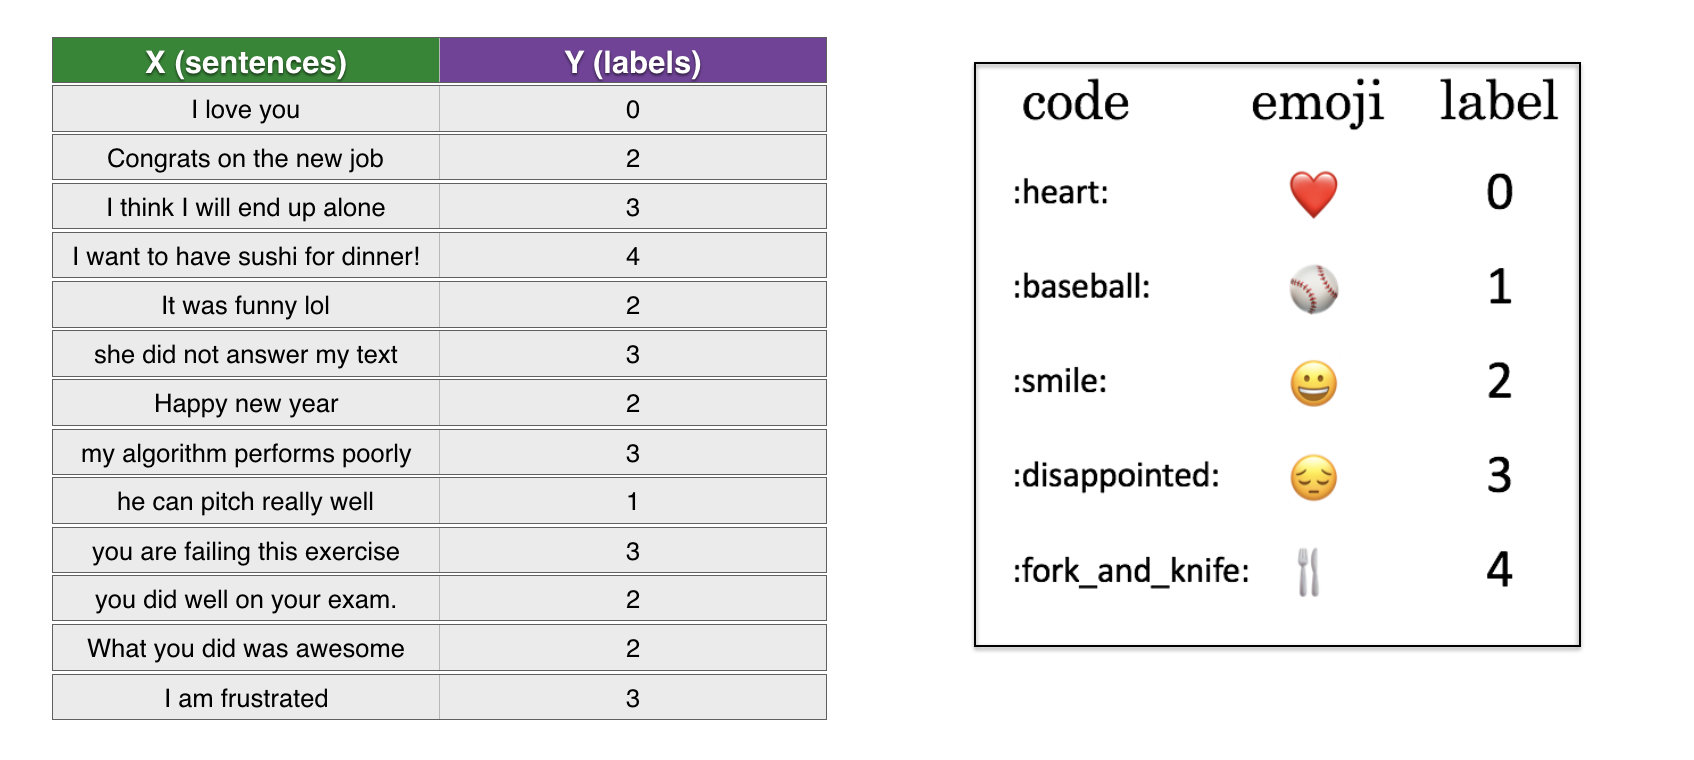
在Keras中词嵌入方法通过定义网络层Embedding()来实现,接下来就结合一个具体的例子说明预训练好的词向量在实际应用中是如何使用的。这个例子的数据集结构如下图所示,需要解决的问题是输入一个句子,找到与该句匹配的emoji图标加入到句子后面。数据集和预训练好的GloVe词向量可点击此链接下载,提取码为oyq2

读取预训练好的GloVe词向量:
|
1 2 3 4 5 6 7 8 9 10 11 12 13 14 15 16 17 18 19 20 |
def read_glove_vecs(glove_file): with open(glove_file, 'r', encoding='utf-8') as f: ### 建立单词与词向量的对应关系 words = set() word_to_vec_map = {} for line in f: line = line.strip().split() curr_word = line[0] words.add(curr_word) word_to_vec_map[curr_word] = np.array(line[1:], dtype=np.float64) ### 建立单词与序号的对应关系 i = 1 #the word index start from 1 words_to_index = {} index_to_words = {} for w in sorted(words): words_to_index[w] = i index_to_words[i] = w i = i + 1 return words_to_index, index_to_words, word_to_vec_map word_to_index, index_to_word, word_to_vec_map = read_glove_vecs('data/glove.6B.50d.txt') |
读取并处理训练和测试数据:
|
1 2 3 4 5 6 7 8 9 10 11 12 13 14 15 16 17 18 19 20 21 22 23 24 25 |
### 读取数据 train = pd.read_csv('data/train_emoji.csv',header=None)[[0,1]] test = pd.read_csv('data/test.csv',header=None)[[0,1]] X_train, Y_train = np.array(train[0]), np.array(train[1], dtype=int) #(132,), (132,) X_test, Y_test = np.array(test[0]), np.array(test[1], dtype=int) #(56,), (56,) maxLen = len(max(X_train, key=len).split()) #将训练集里最长的句子的长度作为输入的序列长度 numclass = len(set(Y_train)) #类别个数 ### 对标签进行one-hot encode Y_oh_train = np.eye(numclass)[Y_train] #(132, numclass) Y_oh_test = np.eye(numclass)[Y_test] #(56, numclass) ### 将句子转换为GloVe中的单词序号,句子长度不足max_len的在后面补0 ### 假设max_len=5,'I love you'->[185457, 226278, 394475, 0, 0] def sentences_to_indices(X, word_to_index, max_len): m = X.shape[0] # number of sentences X_indices = np.zeros((m,max_len)) for i in range(m): # loop over sentences # Convert the ith sentence in lower case and split it into words. sentence_words =X[i].lower().split() # Loop over the words of sentence for j,w in enumerate(sentence_words): # Set the (i,j)th entry of X_indices to the index of the correct word. X_indices[i, j] = word_to_index[w] return X_indices X_train_indices = sentences_to_indices(X_train, word_to_index, max_len = maxLen) #(132, maxLen) X_test_indices = sentences_to_indices(X_test, word_to_index, max_len = maxLen) #(56, maxLen) |
构建词嵌入层,将输入的单词转换为词向量:
|
1 2 3 4 5 6 7 8 9 10 11 12 13 14 15 16 17 18 19 20 |
from tensorflow.keras.layers import Embedding ### Creates a Keras Embedding() layer and loads in pre-trained GloVe 50-dimensional vectors def pretrained_embedding_layer(word_to_vec_map, word_to_index): ### word_to_index: note that the word index start from 1 ### add an extra row to represent the padding. Input: 0, Output: zero vector vocab_len = len(word_to_index) + 1 emb_dim = 50 #length of pre-trained GloVe word vectors ### Step 1: Initialize the embedding matrix as a numpy array of zeros emb_matrix = np.zeros((vocab_len,emb_dim)) ### Step 2: Set each row "idx" of the embedding matrix to be the word vector of the idx'th word of the GloVe vocabulary for word, idx in word_to_index.items(): emb_matrix[idx, :] = word_to_vec_map[word] ### Step 3: Define Keras embedding layer with the correct input and output sizes ### if trainable=True, keep updating the embedding matrix (i.e., fine tuning) embedding_layer = Embedding(vocab_len, emb_dim, trainable=False) ### Step 4: Build the embedding layer, it is required before setting the weights of the embedding layer. embedding_layer.build((None,)) ### Step 5: Set the weights of the embedding layer to the embedding matrix embedding_layer.set_weights([emb_matrix]) return embedding_layer |
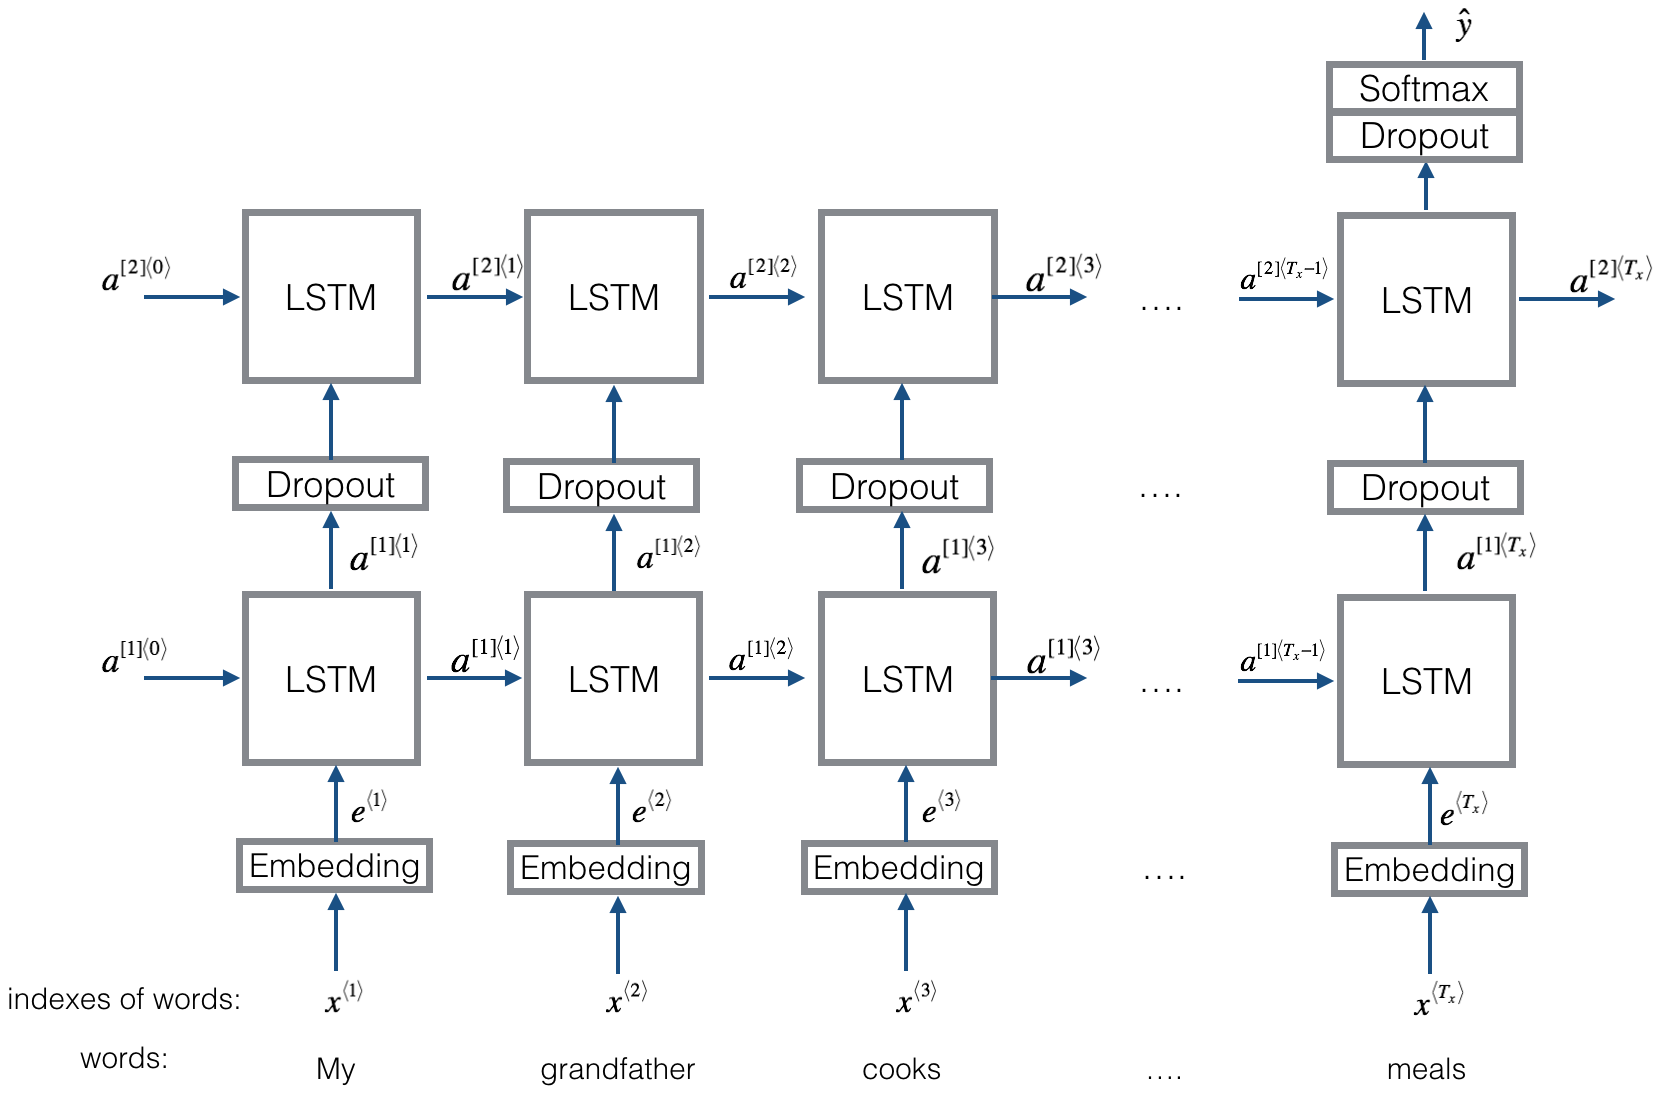
因为要处理的是一个序列问题,每个序列输出一个标签,因此网络搭建时结合了词嵌入方法和多对一(many to one)的LSTM,网络架构如下图所示,这里使用了两层的LSTM:

|
1 2 3 4 5 6 7 8 9 10 11 12 13 14 15 16 17 18 19 20 21 22 23 24 |
from tensorflow.keras.models import Model from tensorflow.keras.layers import Dense, Input, Dropout, LSTM, Activation ### Function creating the model's graph def Emojify(input_shape, word_to_vec_map, word_to_index, numclass=5): sentence_indices = Input(shape=input_shape) #(None, maxLen) # Create the embedding layer pretrained with GloVe Vectors embedding_layer = pretrained_embedding_layer(word_to_vec_map, word_to_index) embeddings = embedding_layer(sentence_indices) #(None, maxLen, 50) # LSTM layer with 128-dimensional hidden state # The returned output should be a batch of sequences X = LSTM(units = 128, return_sequences=True)(embeddings) #(None, maxLen, 128) X = Dropout(rate=0.5)(X) #add dropout with a probability of 0.5 # Another LSTM layer with 128-dimensional hidden state # The returned output should be a single hidden state, not a batch of sequences. X = LSTM(units = 128, return_sequences=False)(X) #(None, 128) X = Dropout(rate=0.5)(X) #add dropout with a probability of 0.5 # Dense layer with numclass units X = Dense(numclass)(X) #(None, numclass) X = Activation('softmax')(X) #add a softmax activation # Create Model instance which converts sentence_indices into X model = Model(inputs=sentence_indices, outputs=X) return model model = Emojify((maxLen,), word_to_vec_map, word_to_index, numclass) model.summary() |
训练并验证搭建的模型:
|
1 2 3 4 |
model.compile(loss='categorical_crossentropy', optimizer='adam', metrics=['accuracy']) model.fit(X_train_indices, Y_oh_train, epochs = 50, batch_size = 32, shuffle=True) loss, acc = model.evaluate(X_test_indices, Y_oh_test) print("Test accuracy = ", acc) |
